There are no wide rock climbing shoes, period. You can make your own wide climbing shoes by customizing a commercial pair to fit your foot exactly
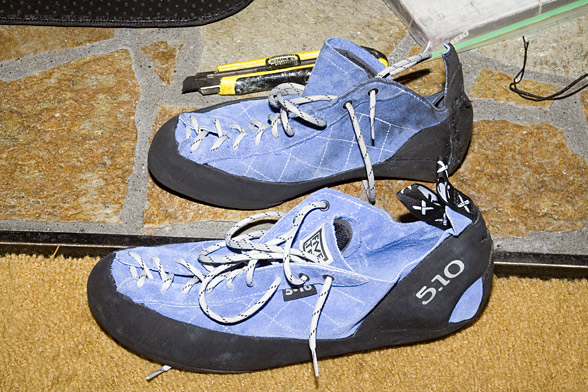
Buy the shoe you want, in the brand you want, but buy it long, up to size US mens 15, to get your width, and cut off the heel. See the finished, customized shoes here. Expect to spend a full weekend on this project. The tools you will need are:
A pair of new rock shoes a couple inches too long, but with the right width
heavy duty razor knife with break off blades
white oil pastel, conte crayon, or other white marker pen
waxed hand sewing thread 1.5mm x 5 yards (synthetic) Tandy Leather
Pliers or vice grips
gorilla duct tape
several 2 inch long beefy hand sewing needles Tandy Leather
a nine dollar leather punch with a 2mm tip Tandy Leather ($50 one is better)
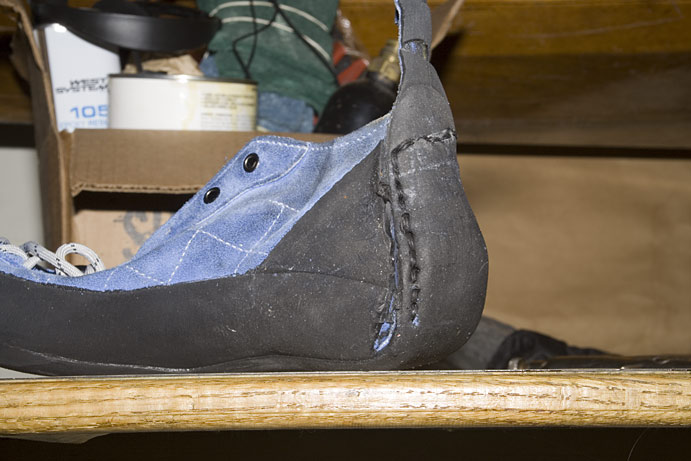
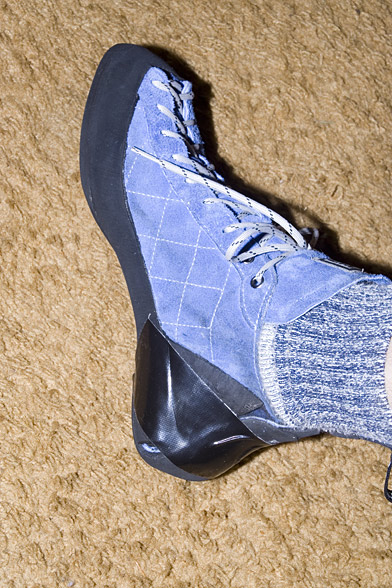
I've been very frustrated finding a rock shoe that fits my super wide 7 EEEEEE foot. Rock Shoe makers have abandoned climbers with wide feet. I went to REI recently to try on climbing shoes, and nothing even came close to fitting my wide foot. On a whim, I started trying longer rock shoes to try to get the width my wide foot needed. I'm a "7, six E" so I tried on a size 9...still too narrow. Finally I tried on a size 15 and the width was perfect, comfortable even. The only trouble was that there was a couple inches of shoe sticking out the back of my heel as shown in this picture. The front of the shoe is the only part that matters. The back of the shoe doesn't get climbed on. You could even leave the shoes open and put a buckle back there, like sandals.
I called a cobbler in Seattle to ask him if he would like to help me shorten the heel. He said that it would be a waste of his time because he'd have to have one of his guys spend half a day on the modifications, and it would only have a 50% chance of working. He basically told me to forget it. This was the answer everyone gave...but I was driven by desperation. I love to climb, and I need shoes that fit! I've tried several different techniques over a dozen shoes, see lower down this page for my earlier attempts. My latest pair of shoes is shown towards the top.
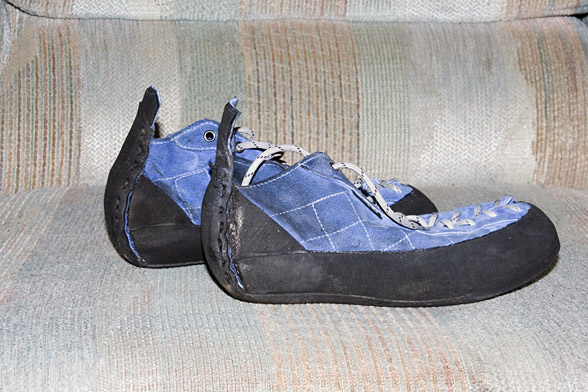
These are my old shoes next to the new shoes. Note that the width in the toe is the same. The old shoes have been modified using the process shown below. I made some marks on the shoe with some white artist oil pastel (or any white marker) indicating approximately where I thought the heel should start. I need enough of the original sole for walking, but then it needs to transition into the new heel. I used to rebuild the heel from scratch, but that was painful, see pictures of that farther down. Now I do a "telescope" heel, which preserves the original heel. This is my oil pastel, but there are other white markers out there. Go to any art store. It's super scary to butcher a brand new pair of $200 rock shoes. If you doubt the process, practice on an old pair of beaters from the used pile at the rock gym. I definitely did a practice run first time around. I cut the sides with one of those razor knives that have the 1 inch breakaway blades. The sole will cut, just be slow and careful. The front and the back. I always do just one shoe at a time. That way I understand the whole process and the second one goes a lot faster. No going back now. I use the razor knife to bevel the edges of the heel. This prevents hot spots in the shoe. I thought the bump of the telescoped heel would be painful, but it isn't a problem. As I said earlier, you climb on your toes, not the heel. I've got the bottom of the heel at the edge trimmed down to about one eighth inch thick to prevent hot spots. Slide the heel into the front of the shoe. The white mark is for alignment purposes. Stick your foot into the shoe...maybe not in that order. Use Gorilla tape to tape the heel to the shoe. I've actually climbed at the gym with my shoes taped like this to make sure the shoes are the right length. Want them agressive? Slide the heel in further and re-tape. Once I had the tape job so perfect I decided to sew right thru the tape to preserve the fit. It was kind of messy though. As with any sewing project, you can always rip the seam out and re-punch, re-sew. Been there and done that many times with these shoes. This is one of my previous pairs where I rebuilt the heel, taped it together and went climbing at the gym to test it out. Side view of the telescoped heel. Note the feathered edges. I also feathered (thinned the rubber) where the stitching was going to go, but this is optional.Make sure that the inner sole of the heel, here it's shown in white, is square and aligned with the inner sole of the front of the shoe. Also the front edge of the heel needs to be flat and pressed down before you start making all your alignment marks. Meaning, you don't want to sew the shoe together with the forward end of the heel sticking up and making a hot spot. Yupp, I made that mistake too. Once I have an idea where the front of the shoe will intersect the heel, I mark a line down the heel with a sharp white pen, then punch holes in both parts every quarter of an inch. Assuming you are doing the right foot first, it is wise to only punch holes on the left side (inside) of the shoe. The reason for only punching one side is that you can baste stitch (partial stitch) that left side, and use tape for the other seam on the outside (right side) of the shoe to check for correct length again. Punching holes one quarter inch apart, one quarter inch in from the white line. A good fine tipped marker from an artist store. Note the white mark going across, 90 degrees to, the seam. This gives me up and down alignment and was done as part of the fitting process. The heel fits perfect. Too bad it's missing the rest of the shoe! I cut that hole so I could get the punch in. I could have cut the extra heel leather away, but I was worried about having a clean hotspot free heel box. Punched and ready for a partial assembly to test fit. If you punch the stitching holes wrong, you can alway punch another line of holes one quarter inch deeper to go up or down half a size. Like going to a tailor for a test fitting of a tux or wedding dress. They baste the fabric together and you put it on to see if it fits. Then later they do the real, permanent stitching. Here I've basted (sewn) one side. Note that there is only 4 stitches. I'm just replicating the gorilla tape. I put the shoe on and pull the other, unpunched side tight to test the fit. You can also tape it in place again to walk around. Pro tip: Gorilla glue comes off with WD40. Once you get the fit right, mark it and punch. It's better to cut the shoe a little on the agressive side short. Also, I wear socks because my shoes never fit perfectly...and this gives me some wiggle room to cushion hot spots, and make up for shoes that are a little big because they stretched.This is one way to do the basting stitching. You keep the leather separated so you can more easily get the needle through. Pliers help to pull the head thru. The Tandy leather needles come blunt. I typically file them to a sharp tip to help when I miss a hole. For the first stitch, I do a double stitch, like a stitch on top of a stitch. I also use a double length of thread when I stitch. Like when you rap off a tree with a single rope. The needle is like the tree. When you start sewing, leave 3 inches of thread sticking out at the top of the shoe on the outside of the shoe. This is for the finishing knot. Another view of the basting stitch A finished side. Note that the stitching doesn't need to go all the way down to the bottom. It holds just fine. I've not had problems with dirt getting in the shoe. I do trim the extra leather away around the back of the heel. Another view of a finished side. Note the knot at the top on the outside of the shoe. If you put the knot at the bottom, it's subject to more wear and tear. For the entire sewn side I use a 3 foot length of doubled thread. For the knots, I use a double stitch, supplemented with a square knot that has an extra wrap. Like you'd use to tie your shoes when you don't want your laces to come untied. I sew from the top down, then back up, which gives you the same *lock stitch* you would get if you had a sewing machine. Once I'm sure of the fit, I paint the seam with tool dip or seam sealer. My stupid wide foot with the finished shoes. I gotta' thank my dad for the feet though. These wide feet are handy in 4 inch offwidth cracks like Fisticuffs in Joshua Tree.Finished shoes
Older versions shown below:
Here I'm getting ready to tape up the heel to see if I've cut deep enough. You may want to have a friend step in the shoe so you can experiment with how to fold up the wings and spine. Wings (sides) go inside, spine (back of shoe) goes outside. The curve that you cut in the wings controls how the heel cup is formed. I ended up cutting about three quarters of an inch deeper before I finally got them short enough, but was glad I'd done it incrementally or I could have ruined them.I tried to sand off the rubber heel side panel strips, but they were bulletproof. I got out a $30 torch from home depot and heated up the unneeded rubber to the point where it started to crackle and smoke (Don't try this indoors!). When the rubber is hot, you can peel it back from the leather like a banana.I found that I got more control if I masked off the rubber I didn't want to remove with either aluminum foil(not too good), or brass shim material (great stuff, [3'x6"x0.005"]), which you can buy at Tacoma Screw Products. Machinists use it to shim machinery when the parts don't fit as tight as they should.Here I've removed (heated and peeled off) the extra rubber, leaving the trimmed "wings", which are folded under the heel spine.I've folded the "wings" under the heel spine, pinched it together and secured the heel for a test wearing, using Gorilla duct tape. It turned out to be too long so I pulled off the tape, which left a messy residue (remove with WD40) and cut everything shorter by a quarter of an inch. Still too short so I cut it all down again by another quarter inch and wore it around the house.
~
You really don't need all that much gorilla tape to test the fit, it makes a mess but fortunately comes off with WD40.
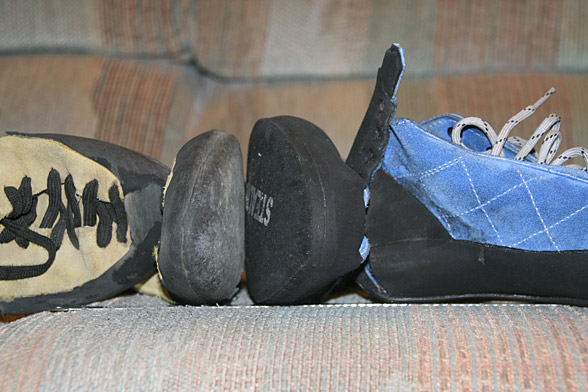
Here I am using my leather punch. The first time I sewed these, I kept the gorilla tape on and punched and sewed at the same time. After I'd finished and realized the shoes were still too long anyway, I got smarter. I cut the stitches out with a sharp razor blade, cut the sole and side shorter again, and carefully marked out new (shorter) hole locations on the wings that matched the existing holes along the heel spine. You can see this in the next photo.This is the second shoe, and I was beginning to understand the process. I cut this shoe a quarter inch shorter than the first to make it fit tight. I pre-punched the spine at quarter inch intervals. I tucked the heel together, held it tightly and carefully marked the spots on the wings with a pen where I'd need matching holes to align with the spine holes, then I punched the wings. It's much easier to punch these holes when the heel isn't taped together with Gorilla tape. Three layers of leather, plus the sole of the shoe make for hard punching. I intentionally left extra leather on the "wings" (sides) so I could use it to lengthen or "let out" the shoe, if I'd accidentally cut it too short. I figured the wings would overlap, and form more padding behind my heel on the spine.Here I'm stitching the heel together through the pre-punched holes. You can buy these blunt hand sewing needles in any drug store, though Tandy Leather has them cheaper. I got my first thread from a shoe repair shop. She gave me 10 yards for free, saying that as long as she didn't have to do the hand sewing, I was welcome to it. On the second shoe, I went to Tandy and bought a $4 roll of 1.5 millimeter x 25 yard waxed synthetic (not cotton!) thread and it was much better, awesome actually.Sometimes the needle is hard to pull through if you miss the pre-punched hole by a bit, so pliers or vice grips work great. To make the first knot, I sewed a complete closed loop through the first two holes, and then simply tucked the loose end of the thread twice under the loop. As I sewed away up the spine from those first two holes, I pulled on the thread, which pulled the loop tighter and grabbed the loose end. It works very much like a clove hitch knot on a carabineer. To finish the seam, I simply repeated the clove hitch process, then ran the bitter end through a few more holes to keep the knot from unraveling.This is the first shoe, carefully hand double stitched, shortly before I decided the size was too long and had to rip out all the stitching. Note, to make them shorter at this point, I had to guesstimate how much more sole to split (one quarter inch), and re-burn off the extra one quarter inch of rubber on the side panel. This is the finished first shoe, size 7 - EEEEEE, sitting beside the untouched left shoe, size 15.Here I'm holding up a piece of paper I traced off the first shoe. I used it as sort of a pattern jig to help me estimate where and how to cut the heel so it would form a tight heel cup. This isn't nearly as complicated as it sounds. I'd never done it before, hell, I'm a web designer, not a cobbler. I had some confusing moments, and had to walk away from the job for a day to think on it, but in the end, it really just seemed like common sense. I must admit that I practiced on an old pair of beater rock shoes to get a sense of how hard it was to cut leather and rubber, and experiment with ideas, before I bought these new ones on sale and began cutting. The masking tape is to protect the pretty blue leather from the dirty black ash that comes off the rubber when you melt it.These are the finished shoes. Note the heel on the left has a more aggressive curve inward at the top. Both heel shapes work, but the more relaxed heel on the right shoe allowed my heel to slip upward a tad, so I changed the curve on the second shoe. Because I have those long wings inside, I can always let them out if the heel starts to rub.The shoes on the left are my old shoes, notice how much narrower they are than my new modified shoes.I've climbed on them at the gym, and they work great, though like any shoe, they need some breaking in on a toe jam crack. The only down side I can see is that they seem a little sloppy. Because I've interrupted the natural lasted arch position by cutting the heel off, the shoe does not hug my arch tightly. I'm not sure yet if this is a deal breaker as I was climbing fine during my test at the gym, and most of you won't have my super high arch problem. I may need to sew in an arch support to get some pressure in the slack area and keep my foot from rolling. Nevertheless, I'm quite pleased with my new "handmade" rock shoes. It's very, very cool to have a sole that is as wide as my foot, instead of the usual scenario, where my wide flipper feet overhang the sole by half an inch on each side.
Once I'm sure they fit, I'll probably take them to a shoe repair shop and have the heels stitched by a machine to make them permanent. Then I might put some seam sealer glue on the stitches to prevent wear. Home depot also sells some liquid rubber used for coating plier handles that might protect the threads.
For those of you with desperately wide feet, I hope this little story helps. See ya on the rocks. I'll be the one with the funny shoes.
My modified size 7 - EEEEEE rock climbing shoe.
My new technique is to fold the wings over and fix them in place with temporary Gorilla tape. I wear them around to see if they fit. Then I sew just one wing in place, the left seam in this photo. I leave the right side of the wing loose, my finger is touching it in this photo. The looseness helps the shoe stay soft on the heel area. Then I cut the other wing short and tuck it underneath the long wing that is sewn. I put the shoe on. I tape the shorter (unsewn) wing down with tape and wear the shoe again. If it feels good, I mark the seam line with white conte crayon (pastel).
I cut the extra rubber off where the stitching will go using a long razor knife, pictured above.
Trimming the extra rubber off is like whittling a stick, quite easy. I think I like it better than a belt sander or the torch technique. It's important to get the heel area as free of rubber as possible to make it easier to bend, form and sew.
Update: 10-6-18
I no longer use a torch, that was too dangerous. Now I use a sharp knife. Trimming off the excess sole leather so it's easier to cut and sew.
Trimming off the excess sole leather so it's easier to cut and sew.
It's thin enough when you are able to squeeze the sole
Marking the heel cut with white oil pastel chalk.
The initial cut down to the new back of the shoe point
Folding up the wings to see the heel shape
Top view of cut down shoe. Note the curve in the cut, this helps form a heel cup.
Decided to make them into high tops.
I put a couple stitches in so I could try them on.
Side view with temporary stitching.
Once I get a fit, I punch the holes up the back first, then measure them out
the same distance apart up the sies. I put them on several times during
this process to make sure they fit, and that a cup is forming in heel.
Inside view of hand stitching. I find that punching the holes larger than
the needle (1/8 inch) makes it easier to sew.
outside view of stitching
I seal the seams with spray on plastidip. This protects them for life of
the shoe.
Done. I find I need to put a thin piece of foam behind my heel until they break in. There are some hot spots.
Update 10-2018 NOTE: this guy put his business on hold but he did awesome work!
If all these instructions seem too hard, and it seems like too much work. You may end up doing what I did after about 10 modified pairs
of shoes. I ordered a pair of custom shoes from knclimbing.com. It was a lot of money, and I still had to add re-inforcement leather
to the inside (his leather was too thin). But these shoes are rocking as trad climbing shoes. I've never had a pair of rock climbing shoes that
fit this good. I can step on almost anything and these will stick. Even right out on the tip of the shoe. They are especially sticky on
slab climbing. He is a great cobbler! He is still learning the trade, but he stands behind his work and will work with you to give you the custom rockclimbing shoe you need.
Here is his website: http://www.knclimbing.com/


 ~
~
 You really don't need all that much gorilla tape to test the fit, it makes a mess but fortunately comes off with WD40.